
Recipes
🍨 Non-Dairy Banana Pecan Ice Cream
I purposely stock up on bananas so that I have some ready to toss in my protein smoothies, make banana muffins, or mix up this special treat. When the banana is a bit too ripe for my liking, I peel it, break it in half and put it in my banana baggie that lives in the freezer. This non-dairy treat is delicious without the addition of sweetener; however you may enjoy trying some of the variations. Makes 2 servings, or 1 serving if you’re really craving bananas. 
Ingredients:
- 2 ripe bananas, sliced and frozen
- 2–3 tablespoons pecans (plus a few extra for topping)
- a splash of milk (I use Silk unsweetened coconut milk)
- Optional: a dash of cinnamon, or a drizzle of maple syrup
Instructions:
- Place the frozen banana slices in a blender or food processor.
- Blend until creamy, scraping down the sides as needed.
- Add the pecans and pulse a few times to incorporate.
- Add a splash of your choice of non-dairy milk for easier blending and a hint of cinnamon or maple syrup for extra flavor, if desired.
- Scoop, top with extra pecans, and enjoy right away!
Extra Tips:
- You can make a bigger batch and freeze it for 30–60 minutes if you want it a little firmer like traditional ice cream.
- Slice bananas thinly before freezing to make blending even quicker.
- Use a food processor for creamier texture vs. a blender if possible.
🎉 Want to Mix It Up? Here Are Some Fun Variations:
- Maple Pecan Banana Ice Cream
- Add 1–2 teaspoons pure maple syrup while blending for a richer, buttery-sweet flavor.
- Top with a drizzle of maple syrup and extra chopped pecans before serving.
- Chocolate Pecan Banana Ice Cream
- Add 1 tablespoon unsweetened cocoa powder or a few dark chocolate chips during blending.
- Or, stir in mini chocolate chips after blending for a chunky texture.

- Cinnamon Toasted Pecan Banana Ice Cream
- Quickly toast the pecans in a dry skillet for 2–3 minutes before adding.
- Sprinkle in ½ teaspoon ground cinnamon while blending for a cozy, spiced flavor.
- Salted Caramel Banana Ice Cream
- Add a tiny pinch of sea salt and a drizzle of date syrup or caramel sauce before blending.
- Top with a few flaky sea salt crystals for a sweet-salty contrast.
- Banana Berry Pecan Ice Cream
- Blend the bananas with a small handful of frozen raspberries, strawberries or blueberries.
- Stir in chopped pecans afterward to keep some crunch.
- Peanut Butter Banana Pecan Ice Cream
- Add 1 tablespoon natural peanut butter when blending the bananas.
- Bonus: peanut butter + pecans = ultra creamy and nutty!
- Tropical Banana Ice Cream
- Blend a few frozen pineapple chunks with the bananas.
- Stir in pecans at the end for a fun tropical-nutty twist.
- Banana Pecan “Chunky Monkey” Style
- Blend bananas with a few chocolate chunks and walnuts (or pecans) to mimic the popular ice cream flavor.
- A few mini marshmallows stirred in could make it even more decadent if you want a fun treat version.
Chocolate Nut Clusters
1 cup bittersweet (at least 70% cacao) chocolate, chopped or wafers
1 cup raw almonds 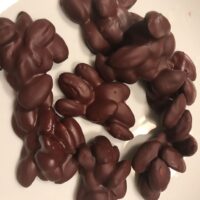
Preheat oven to 300 degrees F. Line a baking sheet with parchment paper and spread the almonds out in a single layer on the sheet. Toast in the oven until golden brown and aromatic, about 15 minutes. Remove and set aside.
Bring a few inches of water to boil in the bottom half of a double boiler. Place the chocolate in the top half of the double boiler and set it on the bottom half. Heat, stirring frequently, until the chocolate is almost melted, about 5 minutes. Remove from heat and whisk until completely melted. Add the almonds and stir to combine.
Drop the nut clusters by spoonful onto a baking sheet lined with waxed paper. Allow to cool and harden. May refrigerate to speed up the process. Store in an airtight container in layers separated by wax paper for up to 2 weeks.
Any raw nut or combination may be substituted for the almonds. Toasted unsweetened coconut flakes may also be added. Higher quality chocolate results in tastier clusters.
This recipe first appeared in the February 2021 issue of Get Healthy, a publication of The Northwest Indiana Times.
The Best Dark Fudgy Brownies
The Best Dark Fudgy Brownies
(That happen to be gluten and dairy-free) 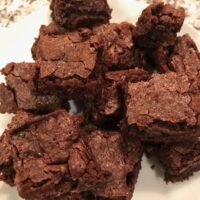
INGREDIENTS
- 2/3 cup cacao powder or Dutch-process cocoa
- 1 ½ cups granulated sugar
- ¾ teaspoon salt
- ½ teaspoon aluminum-free baking powder
- 1 cup gluten-free flour (I like Namaste or King Arthur brands)
- ½ cup dairy-free dark chocolate chips (optional)
- 3 large eggs
- ½ cup extra virgin olive oil
- 2 Tablespoons water
DIRECTIONS
Preheat oven to 350°F. Lightly oil/grease an 8” or 9” square pan. Whisk together cocoa, sugar, salt, baking powder, flour, and chips. Stir in eggs, oil, and water. Mix until well blended. Using a rubber scraper, scoop the mixture into pan, smoothing the top. Bake brownies for 45 minutes (for 8” pan) or 35 minutes (for 9” pan), until a toothpick inserted into the center comes out with just a few moist crumbs. Cool on a rack for about 1 hour before slicing.
If using a glass pan, reduce baking temperature to 325°F and bake 5-10 minutes less.
Carol’s Amazing Gluten Free, Dairy Free Coconut Cake
2 ½ cups Namaste Perfect Flour Blend
5 eggs, separated, room temperature
5 Tbsp. Earth Balance Buttery Sticks, room temperature
½ cup coconut oil, melted
2 cups sugar (may decrease sugar to just a little more than 1 ¾ cups and you won’t notice)
1 tsp. vanilla extract
1 ¼ tsp. baking soda
1 cup reconstituted goat milk (or other non-dairy beverage) with 1 Tbsp. white vinegar or fresh lemon juice added
1 ½ cups unsweetened coconut 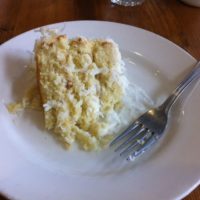
Directions
- Preheat oven to 350° F. Grease a 13×9 pan or two round baking pans. (I like to use some Earth Balance or coconut oil.) If using round baking pans, line with parchment paper.
- Cream butter, coconut oil, and sugar until fluffy. Add egg yolks one at a time beating after each addition. Stir in vanilla.
- Combine flour and baking soda in a separate bowl. Add the flour mixture to the butter mixture alternating with the goat milk mixture. Start and end with the dry ingredients. Blend in the coconut.
- In a separate bowl, beat egg whites just until peaks form. Fold gently into cake batter. Bake for approximately 40 minutes for a 9×13 pan or about 25 minutes for cake rounds. Cake is done when toothpick inserted in center comes out clean.
- Frost with vegan cream cheese frosting.
Vegan Cream Cheese Frosting
1/2 cup (1 stick) Earth Balance Buttery Sticks, room temperature
One 8-ounce container vegan cream cheese, out of the fridge for 1 hour (like Kite Hill plain cream cheese)
1 tsp. vanilla
3 to 5 cups organic powdered sugar
Directions
- In a large mixing bowl, add softened butter and beat well. Add vegan cream cheese and vanilla, and mix again until creamy and smooth.
- Add powdered sugar in 1 cup (or less) increments until thick and spreadable.
- You want this frosting to be fairly thick so it won’t slide around. Keep adding powdered sugar until it reaches the right consistency. Refrigerate the frosting for about 30 minutes to make it easier to frost the cake.

NOTES:
*Other gluten free flours may work well, although I usually use Namaste.
*You can cut the sugar in a cake recipe by 10%. It won’t affect the consistency and it’s sweet enough—especially with frosting.
*Adding vinegar or lemon juice to goat milk creates “buttermilk.” My favorite goat milk is Meyenberg Whole Powdered Goat Milk. The powder keeps well in the fridge for months and you can make fresh when needed.
*The first time I made this cake, I underbaked it a bit. Once the toothpick comes out clean, I bake it for a few more minutes, as long as it’s not getting too brown. Gluten free products sometimes need a little more cooking or baking time. Also, the more I make it, the better it seems to turn out. Like everything, practice makes perfect. So, if your first cake doesn’t quite hit the mark, try again.
Cake recipe derived from Namaste.
Frosting recipe derived from Minimalist Baker.
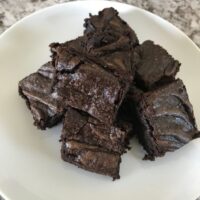
Carob Brownies
(This recipe first appeared in the August 2020 issue of Get Healthy, a publication of The Northwest Indiana Times.)
Ingredients:
- 1/2 cup all-purpose flour or gluten-free flour
- 1/2 cup roasted carob powder
- 1/4 teaspoon salt
- 1 cup cane sugar
- 1/2 cup butter or oil
- 2 large eggs
- 1 teaspoon vanilla extract
- 1/2 cup chopped nuts (optional)
- 1 tablespoon powdered sugar to sprinkle on baked brownies (optional)
Directions:
- Preheat oven to 350° F.
- Grease an 8×8 pan.
- Place dry ingredients (minus the sugar) in a bowl and whisk to thoroughly combine. Set aside.
- In another large mixing bowl, combine butter and sugar and cream the mixture until fluffy and white. Add eggs and vanilla and beat until combined.
- Add dry ingredients and nuts (optional.) Beat just until wet and dry ingredients are combined. Scrape brownie mixture into prepared baking pan. (If you make a double batch, divide the mixture evenly between two pans for best results.)
- For a metal pan bake for about 25 minutes at 350° F OR if using a glass pan bake about 35 minutes at 325° F. Check them for doneness 5 to 10 minutes before your timer beeps.
- Watch cooking times carefully. When a toothpick inserted into center of baking dish comes out clean brownies are done. Try not to over-bake as brownies are supposed to have a soft, chewy center.
- Cool for at least 15 minutes before cutting. When cool, sprinkle with powdered sugar (optional). Store in an airtight container.
Note: These have the taste and consistency of brownies made with cocoa. There are variations that lean to the healthier side that I’m happy to share if you wish to contact me. Reducing the sugar by about 10% is a good first step and will not affect consistency.
Gluten Free Pie Crust
This recipe yields two 9-inch pie crusts.
- 2 cups Gluten Free All Purpose Flour Blend (Namaste and King Arthur are brands I’ve used)
- 1/2 teaspoon salt
- 8 Tablespoons butter, well chilled
- 1 large egg, slightly beaten
- 8 to 10 Tablespoons ice cold water
In a large bowl combine the gluten free flour blend and salt. Cut the butter into the flour mixture until crumbly and the particles are the size of small peas. (You could use a box grater to shred the butter into the flour or cut into small pieces, then mix using a pastry blender, fork, or your fingers.) Make a well in the center of the flour mixture and add the beaten egg. Gently work it in with your fingers until the mixture is crumbly. Be gentle and work quickly to keep the dough as flaky as possible. Overworking your pie dough results in a tough crust.
Add the iced water to the center, one tablespoon at a time, working it in by hand until you have a moist, crumbly dough. The crumbles should stick when squeezed together. Gluten free crust should be made with more liquid than a traditional pie crust, or else it will become very dry.
Shape the dough into a large ball and cut in half. Place each half onto a sheet of parchment paper that has been sprinkled with a bit of gluten free flour blend. Form each half into a smooth disk. Sprinkle with more flour blend and cover with another piece of parchment.
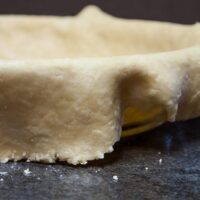
Roll each disc between the parchment paper until it is 2 inches larger than the pie plate. Carefully peel off the top layer of parchment. Pick up the rolled pie crust by the under layer of parchment, center it over the pie plate, and quickly flip it over onto the plate. Carefully pull the bottom layer of parchment off the pie crust. If the crust breaks in a few spots, and it probably will (so don’t panic), pinch the dough back together in those spots.
Note: If you plan to have the dough sitting out in a ball while you are preparing the filling, keep it covered with a lightly dampened paper towel, as it tends to dry out quickly. Gluten free pie dough is fragile, so a little cracking when transferring it to the pie plate is normal.
Strawberry Crumble
- 4 cups strawberries, halved
- 2 Tablespoons arrowroot (or cornstarch or tapioca starch)
- 2 teaspoons pure vanilla extract
- 1 Tablespoon fresh lemon juice
- 1 Tablespoon pure maple syrup
FOR THE CRUMBLE TOPPING
- 1 cup almond meal/flour (or all-purpose flour or oat flour)
- ½ teaspoon kosher salt
- 3 Tablespoons coconut oil (melted) or avocado oil
- 2 Tablespoons pure maple syrup
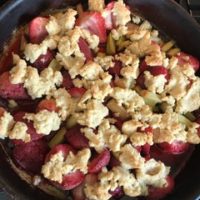
Preheat the oven to 350 degrees F. In a mixing bowl, toss together the strawberries, arrowroot, vanilla extract, lemon juice, and maple syrup. Transfer to an 8” x 8” baking pan. Mix together the ingredients for the topping in a mixing bowl. Spread it over the strawberries as evenly as possible. Bake for 25-30 minutes, until the strawberries are juicy and bubbly, and the topping is golden-brown.
You could substitute other fruits for the strawberries, depending on what’s in season. I like to use 2 cups rhubarb and 2 cups strawberries and add a bit more maple syrup.
Almond Butter Oatmeal Cookies
This recipe makes a delicious substitute for peanut butter cookies that avoids many of the common food allergens. And they’re vegan and gluten free.
Almond Butter Oatmeal Cookies
- 1 1/4 cups gluten free old fashioned oats
- 2 cups almond flour
- 1 teaspoon baking soda
- ¼ teaspoon salt
- ¼ cup Earth Balance Soy Free Buttery Sticks, softened
- ½ cup creamy almond butter
- 1/3 cup pure maple syrup
- 1 tablespoon pure vanilla extract
- Organic cane sugar (optional for pressing cookies before baking)
Preheat oven to 350 degrees F. In a large mixing bowl, combine the Earth Balance, almond butter, maple syrup and vanilla. Add oats, almond flour, baking soda and salt. Mix well.
Drop by teaspoonful or small cookie scoop onto a baking sheet lined with parchment paper. Gently press the dough flat. You may use the bottom of a glass dipped in cane sugar, if desired.
Bake for 6 to 8 minutes, until the cookies barely start to crack at the top. Be careful not to overbake. Allow them to cool on the pan for at least 5 minutes before moving them so they don’t crumble and break. Store in an airtight container. I freeze them so they last longer. Makes about 3 dozen.
You could toss in some raisins and/or chocolate chips if you like more goodies in your cookies.
Crock Pot Trail Mix
This slightly sweet recipe will give you energy on and off the trail. The nuts offer protein, fiber, and fat, along with some vitamins and minerals. A handful, about ¼ cup, makes a great snack any time of day.
- 2 cups raw walnuts (halves or coarsely chopped)
- 1 cup raw whole almonds (or cashew halves)
- 1 Tablespoon sugar
- 2 to 3 Tablespoons coconut oil (or 1 to 1 ½ Tablespoons butter, cut in slices)
- 1 teaspoon vanilla extract
- 1/3 cup semi-sweet or dark chocolate chips
Place nuts, sugar, coconut oil, and vanilla in a crock pot and mix. Place on High for 45 to 60 minutes and stir occasionally to prevent burning. Turn to Low and continue cooking for an additional 20 to 30 minutes, stirring a time or two. Place the nut mixture on paper towel to absorb excess oil, and let cool at least 15 minutes before mixing in the chocolate chips. Store in an airtight container or Ziploc bag.
Gluten Free Pumpkin Chocolate Chip Cookies
Ingredients
- 1 egg
- 1/3 cup unsweetened, smooth almond butter
- 1/2 cup canned 100% pumpkin
- 1/2 cup organic cane sugar
- 2 tsp pure vanilla extract
- 2 1/3 cups blanched almond flour
- 1 tsp baking soda
- pinch of sea salt
- 1 tsp ground cinnamon
- 1 tsp pumpkin pie spice*
- 1/2 cup dark chocolate chips
Directions
Preheat oven to 350 degrees F. In a large bowl, whisk together egg, almond butter, pumpkin, sugar, and vanilla extract. In a separate bowl, combine the almond flour, baking soda, salt, cinnamon, and pumpkin pie spice. Slowly mix the dry ingredient mixture into the wet ingredients. Combine until cookie dough forms, then stir in the chocolate chips. If dough is too sticky and difficult to work with, chill in the freezer for about 10 minutes.
Once dough is chilled, roll into balls, or use a small cookie scoop. Place scoops on cookie sheets that have been lined with parchment paper, for easy cleanup. Bake for 10-12 minutes, until they are set. Be careful not to overbake. Remove from oven and let set for about 5 minutes. Transfer to wire racks to cool. Store in airtight containers in the refrigerator or freezer. I store my cookies in the freezer, as they are always soft enough to eat immediately.
*Homemade pumpkin pie spice: 1/2 tsp cinnamon, 1/4 tsp ground ginger, 1/8 tsp allspice, 1/8 tsp ground nutmeg


